When you receive your walker, there will be a
cardboard box inside the base unit. Inside the box are all the items you need to
install the horse walker.
There always seems to be some confusion on the electrical installation. This document hopefully will eliminate the
confusion.
IMPORTANT! If you have a 110 VAC Outlet within 8
feet of the location you are mounting the Controller, then you do NOT need an
electrician to install this walker. That is the only outlet you will need for
the entire walker installation. If you need an electrician to install the 110
VAC outlet for the Controller, tell him it must not be GCFI controlled.
There are only 2 electrical components associated with the installation:
To install the electrical components:
Complete the installation of the base unit and arms and insure the base is properly bolted to the concrete pad.
Do NOT plug in the controller until all you are instructed to!
1. Mount the controller (see note at bottom of page). Do NOT plug in the Controller!
2. Remove the large Female plug from the end of the 55 foot cable that is attached to the Controller. Note the
color code and location of the wires in the plug before you remove the plug, or take a photo of the plug showing how it
is hooked up before you remove the wires.
3. Tape the wires at the end of the cable to protect them, and push the cable thru the conduit from the controller end until
the cable comes out inside the base unit.
4. Re-install the plug on the end of the cable inside the base unit. Make sure the wiring matches the original
configuration. If you are not sure its correct - STOP and call ProWalk!
5. Connect the male and female plugs in the base unit and twist them to lock
the plugs together.
6. Make sure the ON/OFF switch on the Controller is OFF.
7. Plug in the Controller.
You are finished!
PROBLEMS or QUESTIONS? - CALL PROWALK at 580-332-5516
Note's on Controller.
It is recommended that the drive be mounted vertically on a flat surface
with adequate ventilation for the back and sides. Use 1 1/2" spacers between
the controller and mounting surface to allow the cooling fins on the back to
dissipate heat. Although the drive is designed for outdoor and
washdown use, care should be taken to avoid extreme hazardous locations
where physical damage can occur. When mounting the drive in an enclosure,
the enclosure should be large enough to allow for proper heat dissipation so
that the ambient temperature does not exceed 40 °C (104 °F) at full rating.
The manufacturer of the Controller (AC Motor Drive) states in their user
manual that plugging the Controller into a GCFI outlet may damage the
Controller.
The Controller comes with a "Tamper Proof Sticker". If
you or anyone breaks the sticker by opening the Controller cover, it will
VOID your warranty. If you are have problems with the Controller, call
ProWalk MFG at 580-332-5516.

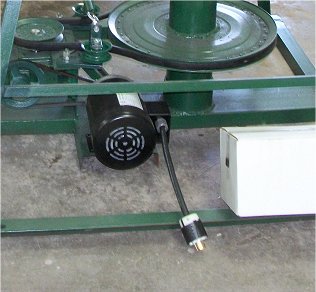 Motor
Motor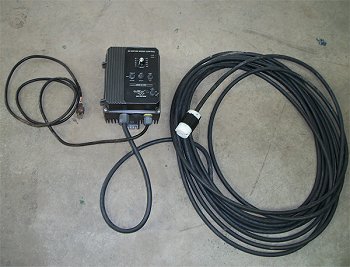 Controller